The most common mistake we get called in to fix on Monmouth and Ocean County bathroom remodels is also one of the most expensive: a beautiful primary bath where the homeowner picked the same large-format porcelain for the shower floor that runs up the walls. The walls look incredible. The floor pools water in three places, the grout is already mildewed by month four, and the homeowner has slipped twice. By the time we are looking at it, the only honest fix is a full shower floor tear-out.
Shower floor tile selection is the opposite of every other tile decision in the bathroom. On the walls, bigger reads cleaner. On the dry floor in front of the vanity, bigger reads modern. In the shower pan, bigger is almost always wrong, and the reason is geometry, not aesthetics. This is the post we wish every Spring Lake, Bay Head, Manasquan, Sea Girt, and Long Beach Island homeowner read before signing the tile order for a primary bathroom.
Why Shower Floors Need Small Tile (The Math)
A shower floor has to do four things that a regular bathroom floor does not. It has to pitch to the drain on a slope of 1/4 inch per foot in every direction from every edge. It has to stay grippy when wet and barefoot. It has to seal at the drain, the curb, and every wall corner. And it has to handle thermal cycling from cold water to hot in the same minute. Large tile fights every one of these requirements.
The drain pitch is the deciding factor. A standard 36 by 60-inch shower pan has the drain in the center or offset to one side. The floor has to slope down to that drain at 1/4 inch per foot from every edge. That means the surface is not flat. It is a shallow four-sided cone. To follow that cone, the tile has to bend. Small mosaics bend easily because each piece is independent and the grout joints absorb the slope changes. A 12-inch tile cannot bend. To put a 12-inch tile on a sloped pan, the installer has to either grind the back of the tile to match the slope, sit the tile flat and create a lippage problem at every joint, or pretend the slope is good enough and skip half of it. None of these end well.
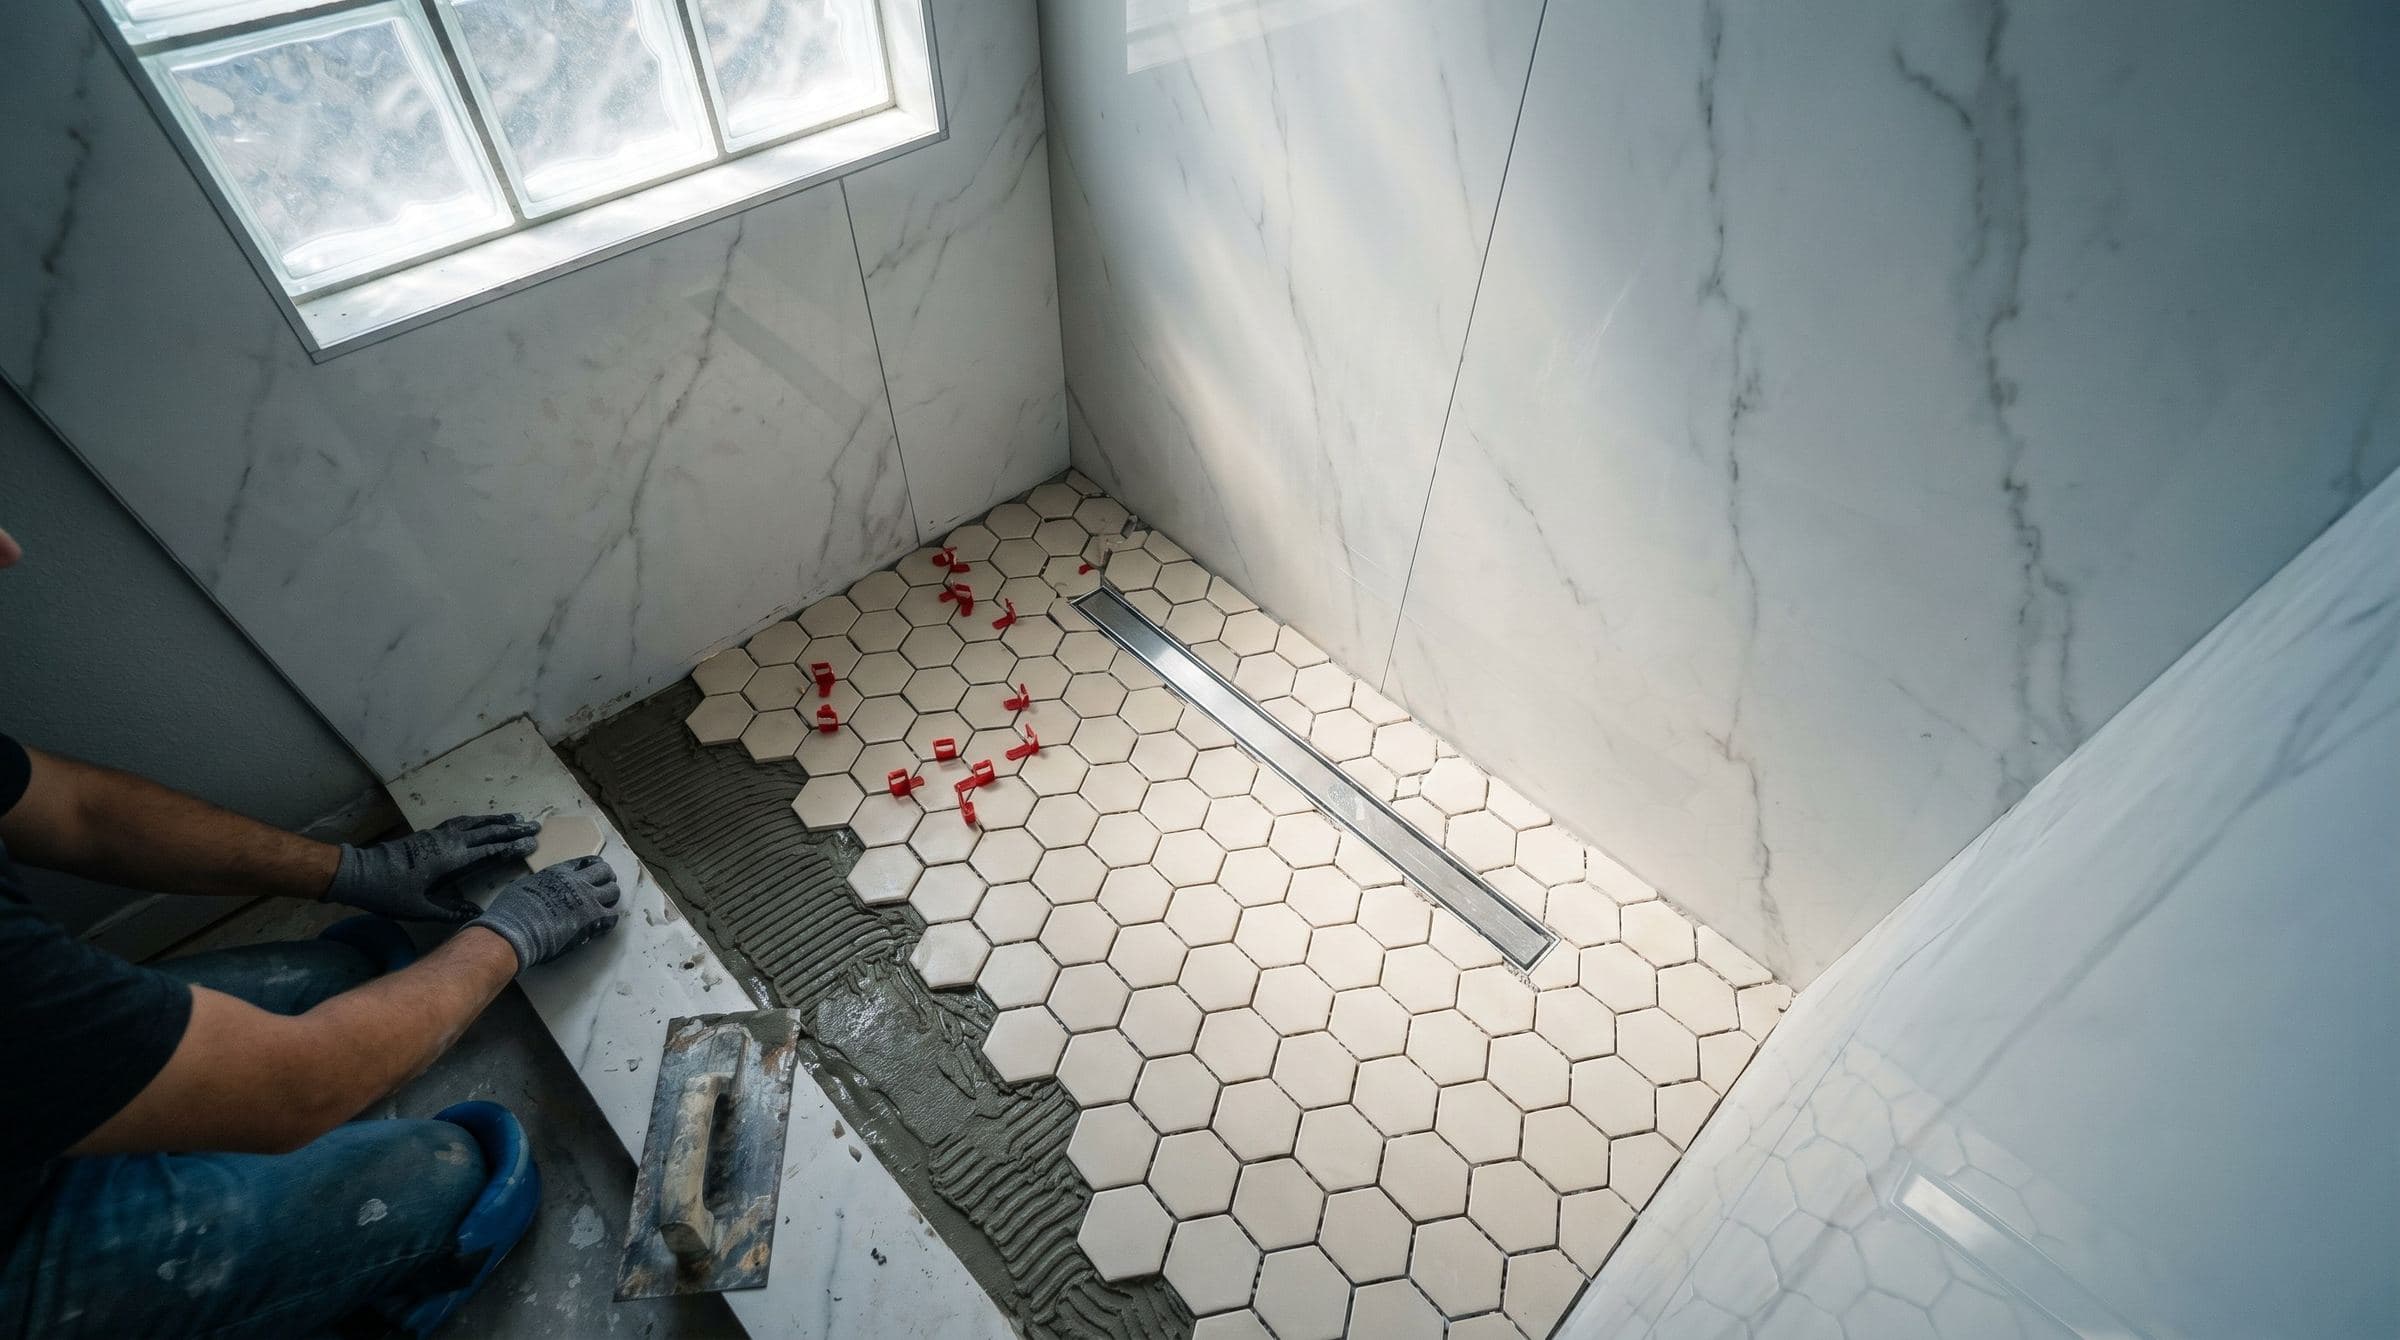
The tile size rule we use: on any shower floor pitched to the drain, no edge of the tile should be longer than 4 inches. The honest sweet spot is 2-inch hexagons or 2x2 mosaics on a sheet. Penny round works on smaller shower pans where the slope is steeper. 1-inch mosaic works anywhere but is more grout to clean.
The Five Shower Floor Tile Sizes That Actually Work
1. 2-inch hexagon mosaic
The current default on Monmouth and Ocean County primary baths. Each hex is small enough to follow the pitch in every direction. The geometry of the hex pattern hides minor variations in installation. Grout lines stay tight because the small pieces lock into each other. We use bone-white and warm gray porcelain hex on most of our shower floors. Cost is mid-range, durability is excellent, and the look reads as classic without being dated.
2. 2x2 square mosaic on sheets
The simplest install, easiest to source, lowest risk. Each 12-inch sheet has 36 individual 2x2 tiles bonded to a mesh backing. The installer presses the whole sheet into the thinset and the small pieces conform to the slope automatically. Good for traditional and transitional bathrooms. Slightly less visual interest than hex but easier to keep clean because the grout lines run in straight grids.
3. Penny round mosaic
The grippiest option. Each penny is roughly 3/4 inch across with grout filling between every coin. Wet bare feet have something to grab. The look is classic and works especially well in white subway-tile shower designs in older shore homes. The downside is grout volume. There is a lot of grout to clean. Epoxy grout is non-negotiable on penny round shower floors.
4. 1x2 brick mosaic (linear)
A more modern look. Small rectangles arranged in a brick or herringbone pattern on the sheet. Reads contemporary, especially in matte black or deep charcoal. Works fine for slope because each piece is small. Best paired with a linear drain rather than a center drain so the rectangles line up with the drain orientation.
5. 4x4 individual tile (the upper limit)
The largest tile we will put on a sloped shower floor, and only when the geometry allows. A 36 by 60-inch pan with a linear drain along one wall slopes in one direction only, not four. That single-pitch geometry is the only case where 4x4 individual tile makes sense, because the tile only has to follow one slope. With a center drain, 4x4 is too large. We do not use it on standard pans regardless of what the design board calls for.
Linear Drains: When Bigger Tile Becomes Possible
The reason large-format tile is showing up in design magazines on shower floors is because the photos are of showers with linear drains, not center drains. A linear drain runs along one wall (or down the middle of the pan, but most installs are wall-side). The floor slopes in one direction only, from the entry edge toward the drain. A single slope can support larger tile because the tile only has to bend in one plane, not two.
With a linear drain, the size envelope opens up:
- 4x4 or 6x6 individual tile: Works fine on a single-pitch pan with a wall-side linear drain. We have done a number of these in Sea Girt and Manasquan primary baths where the homeowner wanted a cleaner look than mosaic.
- 4x12 or 6x12 plank tile: Works if the planks run perpendicular to the slope. Each plank crosses the full slope distance and presents a single grout line at each long edge that absorbs the pitch.
- 12x24 large format: Only with a linear drain and only on a pan where the slope is gentle and uniform. We have done one or two of these and they are unforgiving installs. Substrate flatness has to be perfect. Mortar coverage has to be 95 percent. The leveling system has to be in every joint. Most installers will say yes to the job, deliver lippage and standing water, and the homeowner pays twice.
The honest take on linear drains: they add cost. The drain itself is $400 to $900 for a quality stainless unit (we specify Schluter Kerdi-Line or Infinity Drain on our installs). The waterproofing is more involved. The slope geometry has to be set by a real installer, not a framer. The total uplift on a typical Monmouth or Ocean County primary bath is $1,500 to $2,500 over a center-drain install. The look is worth it if the design calls for it. For most shore-area bathrooms, a center drain with hex mosaic is the right call and looks great.
Grip and Slip Resistance: The Specification You Should Be Asking For
Tile grip is measured by the Dynamic Coefficient of Friction (DCOF) rating. The ANSI A137.1 spec for wet barefoot areas, including shower floors, is a DCOF of 0.42 or higher. Most large-format porcelain tile clocks in around 0.30 to 0.38. Most mosaic shower-floor tile clocks at 0.55 to 0.75 because the small pieces and the grout lines add texture that helps wet bare feet.
Ask the showroom for the DCOF rating before buying. If the tile is rated below 0.42, it is not legally specified for a wet barefoot shower floor under the standard, regardless of how the showroom markets it. We have had two homeowners in the past year hand us a tile they bought online that ran 0.31 DCOF and ask if it would be fine on the floor. The honest answer is no, not in a shower, and we will not install it.
This is also why polished tile is wrong for shower floors. A polished porcelain might run 0.20 DCOF wet. It is slippery enough to put a 70-year-old on the bathroom floor with a hip fracture. Matte or honed finishes are the only acceptable choices on a shower floor. Glossy finish stays on the walls.
Grout Selection: Why Standard Grout Will Fail on a Shower Floor
The shower floor sees more water, soap, body oils, and shampoo runoff than any other tile surface in the house. Standard sanded cement grout is porous, stains, mildews, and breaks down. By year three, the joints are dark and discolored. By year five, the grout is crumbling and water is getting under the tile.
Epoxy grout is the only acceptable choice for a shower floor. We covered the full epoxy versus cement grout question in our grout color and selection guide, but the short version is: on shower floors, the answer is always epoxy. The cost difference on a 9-square-foot shower pan is roughly $80 to $150 in materials and about half a day of additional labor. The mildew resistance and longevity buy back that cost in the first two years.
Grout color matters too. White grout on a shower floor will look gray within six months no matter what you do. Charcoal, mid-gray, or a warm taupe is the right choice for any shower floor that gets daily use. The color hides the staining that does happen and ages predictably.
Why Most Shower Floor Failures Start at the Curb and the Drain
Even the right tile fails if the waterproofing is wrong. The two failure points we see most on call-backs in Monmouth and Ocean County:
The curb. The top of the shower curb has to be the high point of the pan. The inside face of the curb has to slope back into the shower. Most installs we are called to fix have a flat-topped curb that drains water down both sides, eventually rotting the framing underneath. The fix is rebuilding the curb with proper slope and re-tiling, not cosmetic.
The drain. The waterproof membrane has to bond to the drain flange, not just sit next to it. We use Schluter Kerdi or Laticrete Hydro Ban with the manufacturer-spec drain assembly. The drain becomes a continuous, sealed transition from membrane to drainpipe. The cheap install glues the drain in and runs the tile over it, leaving water to migrate around the flange. We covered this in detail in our shower tile cracking and failure guide.
What a Real Shower Floor Install Looks Like Start to Finish
The process on a typical Monmouth or Ocean County primary bath shower, the way it should run:
- Dry-pack mud bed pitched to the drain. Sand and Portland cement mix, packed to a quarter-inch-per-foot slope from every edge to the drain. The installer checks the slope with a level and a straightedge in multiple directions before letting it cure.
- Waterproof membrane. Schluter Kerdi or Laticrete Hydro Ban over the dry-pack and up the walls a minimum of 6 inches above the finished curb. Drain assembly bonded to the membrane with the manufacturer's seal kit.
- Flood test. Plug the drain, fill the pan with water, mark the level, wait 24 hours. The water level should not drop. This is the single most important step and the one most cheap installs skip.
- Thin-set bed for the floor tile. A modified thinset matched to the tile body, troweled with a 1/4-inch V-notch for mosaic or a 1/4-inch square notch for slightly larger pieces.
- Set the mosaic sheets or hex pattern. Press each sheet into the thinset, beat it in with a rubber float, check for full bonding. Cut to fit at edges.
- Cure 24 to 48 hours. No foot traffic on the new floor during the cure.
- Epoxy grout. Mix per spec, apply with epoxy float, work into joints, wipe clean with the epoxy-specific cleaning kit. Two-pass cleanup.
- Seal the curb and corners. A bead of color-matched 100 percent silicone in the corner where the floor meets the wall and where the floor meets the curb. Silicone, not grout, on every movement joint.
The full shower floor install runs two to three days from dry-pack to finished epoxy. The flood test alone is a full day. Any contractor offering to finish a shower in one day is skipping the flood test and the cure times, and the homeowner is going to find out about it at year three.
How JL Tile Handles Shower Floors in Monmouth and Ocean County
We do not use anything larger than 2-inch mosaic on a center-drain shower floor, regardless of what the homeowner brings in from Pinterest. On linear-drain pans we will go up to 4x4 if the geometry supports it, but we walk the customer through why mosaic is still the better call most of the time. Every shower floor we install gets a Schluter Kerdi or Laticrete Hydro Ban membrane, a flood test, and epoxy grout. The drain is always a Schluter Kerdi-Drain or Infinity Drain assembly bonded directly to the membrane.
The work costs more than the cheap install down the road. It is also the reason we do not get called back to fix our own showers. If you are planning a bathroom remodel in the Monmouth or Ocean County shore area and the tile selection is still open, come into the showroom or have us out for a site visit. We will show you the mosaic options that will actually work on your pan geometry and walk through the install spec line by line.