The shower niche is the smallest detail in a Jersey Shore bathroom that causes the largest share of the expensive failures we get called to fix. A niche looks like a simple cutout in the wall for shampoo and soap, and most of the time it is treated like one on the job site. The real niche is a five-sided pocket cut into the wet wall, with five seams, four corners, a horizontal shelf that holds water, and a bottom that drains either correctly or not at all. Get the waterproofing right and a shore niche lasts as long as the rest of the tile. Get one detail wrong and the niche becomes the entry point that rots the framing behind the wall while the bathroom looks fine from the outside.
We rebuild more bathrooms in Monmouth and Ocean County because of a leaking niche than for any other single reason. Almost every one of those failures traces back to the same five mistakes. Here is how a niche should actually be sized, framed, waterproofed, and tiled at the shore, and the corners we see cut over and over on the homes we get called to fix.
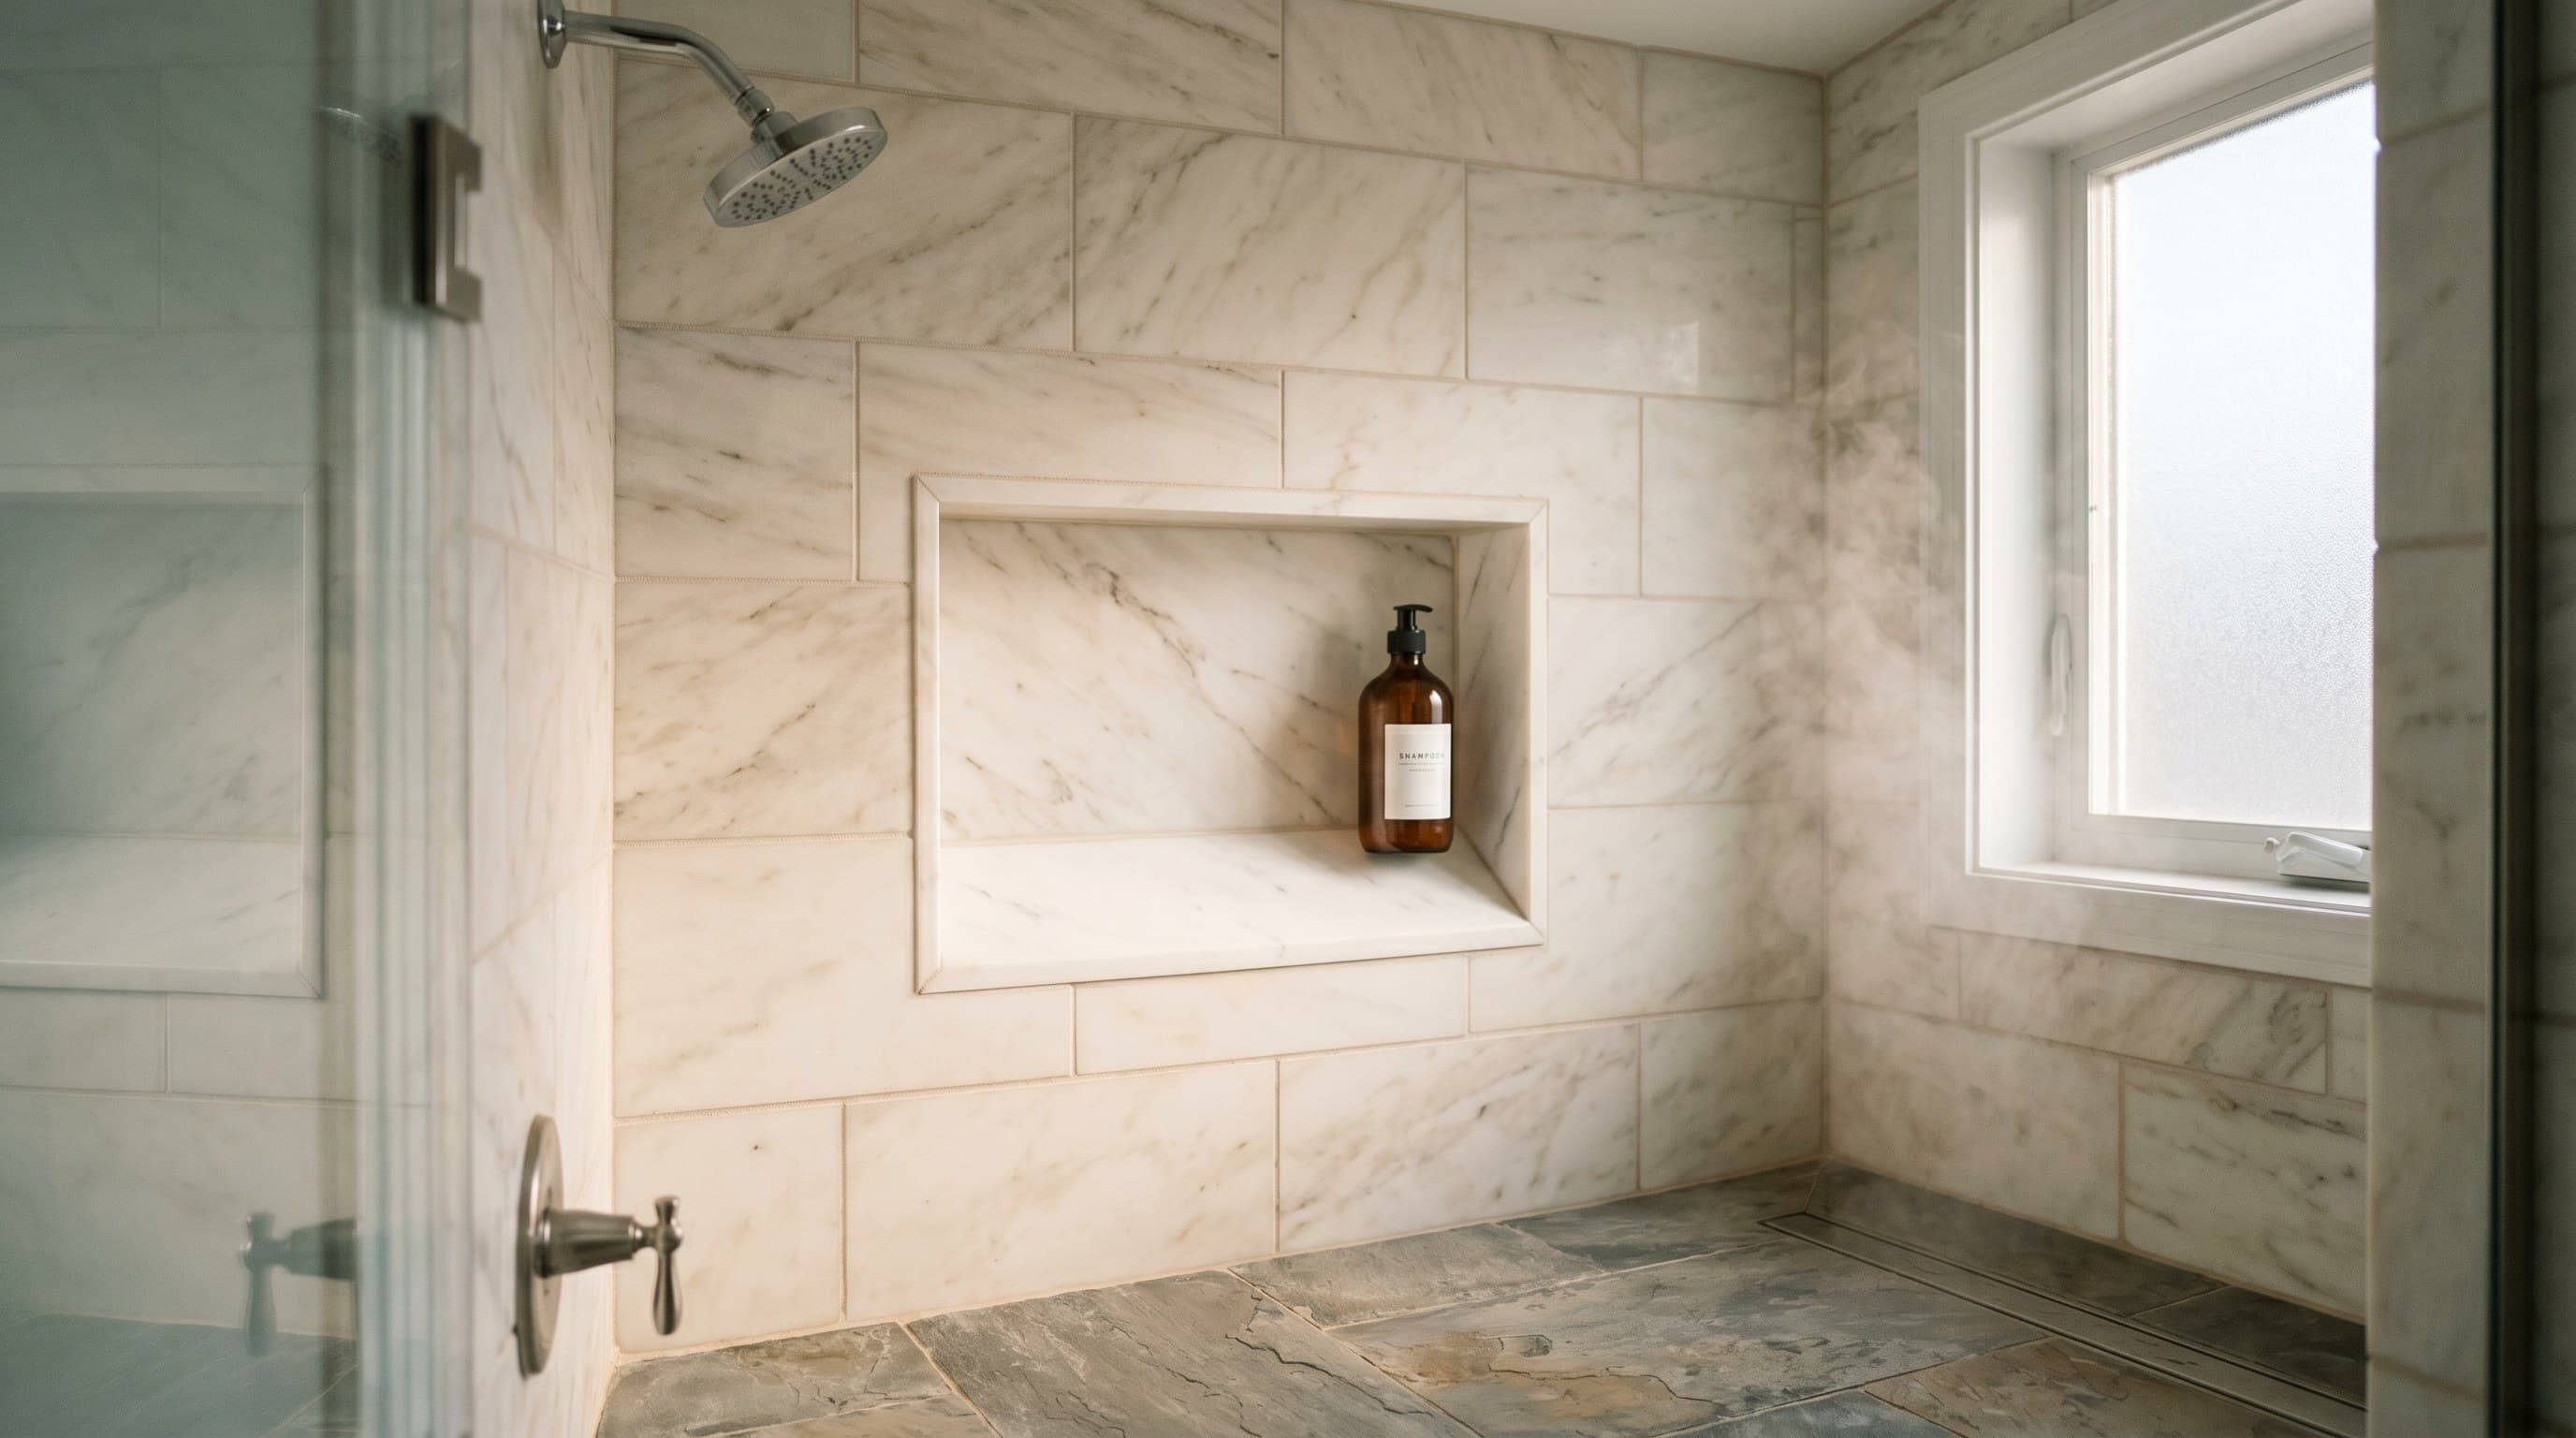
How to Size a Shore Niche So It Actually Works
The first decision is where the niche goes and how big it is. This sounds like a finish-level choice, and it is half that. The other half is structural and has to be settled before the framing is closed up.
- Width: between two studs. The cleanest niche sits in the bay between two existing studs, typically about 14 to 14.5 inches of usable interior width on a 16-inch on-center wall. Wider niches mean cutting a stud and headering above and below, which is fine on a non-load-bearing wall but is a job that has to be detailed correctly, not improvised.
- Height: usable, not maximum. A typical shore niche runs 12 to 16 inches tall. Taller niches sometimes get split with a shelf so a shampoo bottle does not have to share a column with a bar of soap. Stretching to 24+ inches gives more storage but adds a horizontal shelf seam that is one more thing to detail correctly.
- Depth: limited by the stud bay. Inside a 2x4 wall the usable niche depth is about 3 to 3.25 inches after waterproofing and tile. Inside a 2x6 wet wall it is closer to 5 inches. Plenty for a shampoo bottle. Anything deeper requires furring out a wall behind, which is sometimes worth doing on a primary bathroom.
- Height off the floor: above the spray. A niche sits high enough to clear the spray pattern and low enough to be useful — typically about 48 to 60 inches off the shower floor for the bottom of the niche, depending on the shower-head height and who uses the bathroom.
- Wall placement: never on an exterior wall if you can help it. A niche cut into an exterior wall at the shore is fighting cold sheathing, wind-driven rain pressure on the back side, and reduced insulation depth at the niche. On a coastal home we put the niche on an interior wet wall whenever the layout allows, and when an exterior wall is the only option we add rigid insulation behind the niche and detail the waterproofing accordingly.
Settle the size and location before the tile guy shows up, not on a sticky note the day of framing. Most of the niches we tear out were sized in the moment with no plan.
The Right Waterproofing System for a Shore Niche
A shower niche is a five-sided wet zone: top, bottom, two sides, and the back wall. Every one of those five surfaces and every seam where they meet has to be waterproofed as a continuous system tied into the surrounding shower wall. A waterproofing system inside the niche that does not bond to the system on the wall around it is not a system at all. It is a paper coat that water will find a way around.
The system we use on every shore bathroom is a bonded sheet membrane (Schluter KERDI is the one we install most, with KERDI-BOARD as the substrate option) or a fabric-reinforced liquid membrane (RedGard, Hydro Ban, or Mapei AquaDefense) over the correct cement-board or foam substrate. The niche walls and floor are waterproofed with the same membrane that runs across the surrounding shower wall, with the membrane lapped continuously from the wall, into the niche, across the bottom and the sides, up the back, and out across the top — never broken at a seam where the niche meets the wall. Every inside corner gets a corner piece or a fillet of liquid membrane reinforcing the angle. Every penetration (none, on a properly built niche, but sometimes a light or a small water-resistant outlet) gets flashed.
Cement board is not waterproof. Greenboard is not waterproof. Either one, screwed into the stud bay of a niche with the seams open and the screw heads exposed, is a niche that will leak. The waterproofing is the system, not the backer.
The Niche Bottom: The Detail Everyone Botches
The single most-overlooked detail on a shower niche is the bottom shelf. It is the horizontal surface inside the niche that holds your shampoo bottle, and unless it is built and tiled correctly, it is also the surface that holds water. Water that sits on the niche bottom seeps into any imperfect seam and ends up inside the wall.
The bottom of a shore niche should be built three ways at once:
- Sloped forward. The bottom slab inside the niche should slope toward the shower, ideally a quarter inch over the depth of the niche, so water that lands on the shelf drains out into the shower instead of pooling against the back corner.
- Tiled with the right joint. The bottom is best tiled with a single piece of stone or large-format tile so there is no grout joint to absorb water in the middle of the shelf. When a joint is unavoidable, it gets a flexible, color-matched sealant, not standard grout.
- Sealed where it meets the back wall. The seam between the niche bottom and the back wall is the most common point of failure. It needs a continuous bead of color-matched silicone or a properly tooled joint, refreshed every couple of years like any other change-of-plane seam in a wet shower.
A flat niche bottom with a grout joint right in the middle is the version of this that fails first, and it is the one we tear out most. The water sits in the corner, the grout absorbs it, the membrane behind eventually loses bond, and the framing finds out about it last.
The Five Mistakes That Make a Niche Leak
Almost every leaking niche we tear out is one of these five problems, sometimes more than one. Every one of them was invisible the day the job finished.
- No waterproofing inside the niche at all. Cement board screwed into the stud bay, tile glued straight onto it, no membrane, no flashing. The most common failure on DIY and low-bid jobs. Water passes through grout the way it always does, hits the bare cement board, and rots the framing.
- Waterproofing inside the niche, not continuous with the wall. A separate piece of membrane glued into the niche, stopped at the lip, with the surrounding shower wall membrane butted up to it instead of lapped over it. Water gets behind the lip at the seam and bypasses the niche waterproofing entirely.
- Flat niche bottom with a center grout joint. Water pools in the bottom corner, sits on the grout, and finds its way through the joint into the substrate. Eventually you see a stain at the top of the next tile down, and by then the damage behind it is real.
- Niche cut into an uninsulated exterior wall with no detail. The cold cavity behind the niche drops to outside temperatures in January, the warm humid shower air condenses on the back of the niche substrate, and the moisture load on the waterproofing is doubled year-round. On a coastal home this is the niche that fails in the third or fourth winter even when the rest of the bathroom is fine.
- No silicone at the change-of-plane seams. The seams where the niche bottom meets the back wall, the sides meet the back wall, and the top meets the back wall need a flexible joint, not grout. Grout cracks at every change of plane in a wet shower because the two surfaces move independently, and the crack lets water through.
None of these are exotic and none of them cost real money to do correctly on the front end. They cost a lot to fix on the back end.
How the Niche Connects to the Rest of the Shower
A shower niche is not an isolated detail. It is part of the same waterproofing system that protects the entire wet zone, and it succeeds or fails together with the rest of that system. The substrate under the tile, the bench if there is one, the curb (or the lack of one on a curbless shower), and the drain assembly all have to work as a continuous bonded waterproof envelope.
We covered the full underlayment system that the niche bonds into in our guide to tile underlayment at the Jersey Shore, the way the rest of the wet zone gets built on a barrier-free shower in curbless shower tile at the Jersey Shore, and the most common surface-level failure pattern in why shower tile cracks. The niche is one component of the same system. It cannot be built correctly in isolation, and it is the first thing to fail when the rest of the system was built in a hurry.
What We Do for a Monmouth or Ocean County Shore Bathroom
On every shore shower we build, the niche is detailed at framing, not at finish. We pick the wall, size the cavity inside a stud bay, set the rough framing with a sloped bottom, waterproof the niche as a continuous extension of the wall membrane with every inside corner reinforced, tile the bottom as a single sloped piece without a grout joint in the middle, and silicone every change-of-plane seam. Done that way, the niche is the strongest part of the wet zone instead of the weakest. Done the other way, it is the leak that nobody can find until the drywall on the other side of the wall is stained.
If you are planning a bathroom remodel anywhere from Belmar down through Bay Head, LBI, or out across Brick, Toms River, and Manahawkin and you want a niche that does not become a tear-out in year three, send a note describing the shower and we will tell you what the right detail looks like for that wall.