Almost every cracked-tile call we get in a Monmouth or Ocean County bathroom comes in the same way. The homeowner points at a hairline crack running across three tiles near the shower, or a grout line that has opened up and is collecting water, and asks why the tile failed. The honest answer is that the tile almost never failed. The layer underneath it did. The crack in the tile is the symptom. The cause is six inches down, in the part of the floor nobody photographs and most installers treat as an afterthought.
Tile underlayment is the system of layers between your subfloor and your finished tile. Get it right and a shore bathroom floor lasts thirty years through every freeze-thaw winter and every humid August. Get it wrong and the floor telegraphs every movement of the house into the grout and the tile, and the failures start the second or third winter. At the Jersey Shore, where the houses move more and the moisture load is higher, the underlayment is not the boring part of the job. It is the job.
Why Underlayment Matters More at the Shore
A bathroom floor in a Princeton colonial sitting on a slab has an easier life than the same floor in a Bay Head, Lavallette, or Long Beach Island home. Three things stack up against a coastal bathroom floor that an inland floor never deals with at the same intensity.
- Houses that move. A lot of shore homes sit on pilings, crawl spaces, or older framed floors that flex underfoot. Many are seasonal or were built and added onto over decades. Every bit of deflection in that subfloor transfers straight into rigid tile and grout unless something in the underlayment absorbs it.
- Moisture, year-round. Coastal humidity sits high all summer, salt air keeps everything slightly damp, and a bathroom adds its own steam load on top. Water that works into an underlayment that was never waterproofed sits, freezes in January, expands, and lifts the tile.
- Freeze-thaw on unconditioned floors. Plenty of shore bathrooms sit over an unheated crawl space or an enclosed porch slab that drops near freezing in winter. Any moisture trapped in the underlayment goes through the freeze-thaw cycle, and freeze-thaw is what turns a small bond failure into a cracked floor.
The spec that survives all three is not the spec a general remodeler defaults to. It is a layered system, and every layer has a job.
The Layers, From the Subfloor Up
Here is what goes under a tile floor we install in a shore bathroom, in order, and what each layer actually does.
1. The subfloor
This is the structural deck, usually plywood or OSB over floor joists, or a concrete slab. The single most common cause of cracked tile in a framed shore home is a subfloor that is too thin or spans too far between joists and flexes under load. The tile industry standard is a minimum of 1-1/4 inches of total subfloor thickness for tile (typically 3/4 inch subfloor plus a 1/2 inch underlayment panel), and the floor must not deflect more than L/360 under load. On a lot of older Ocean County homes we open up, the existing subfloor is a single layer of 5/8 plywood spanning 16 inches, which is not enough for tile. Fixing this means adding a layer or sistering joists before any tile goes down. Skip it and nothing above it will save the floor.
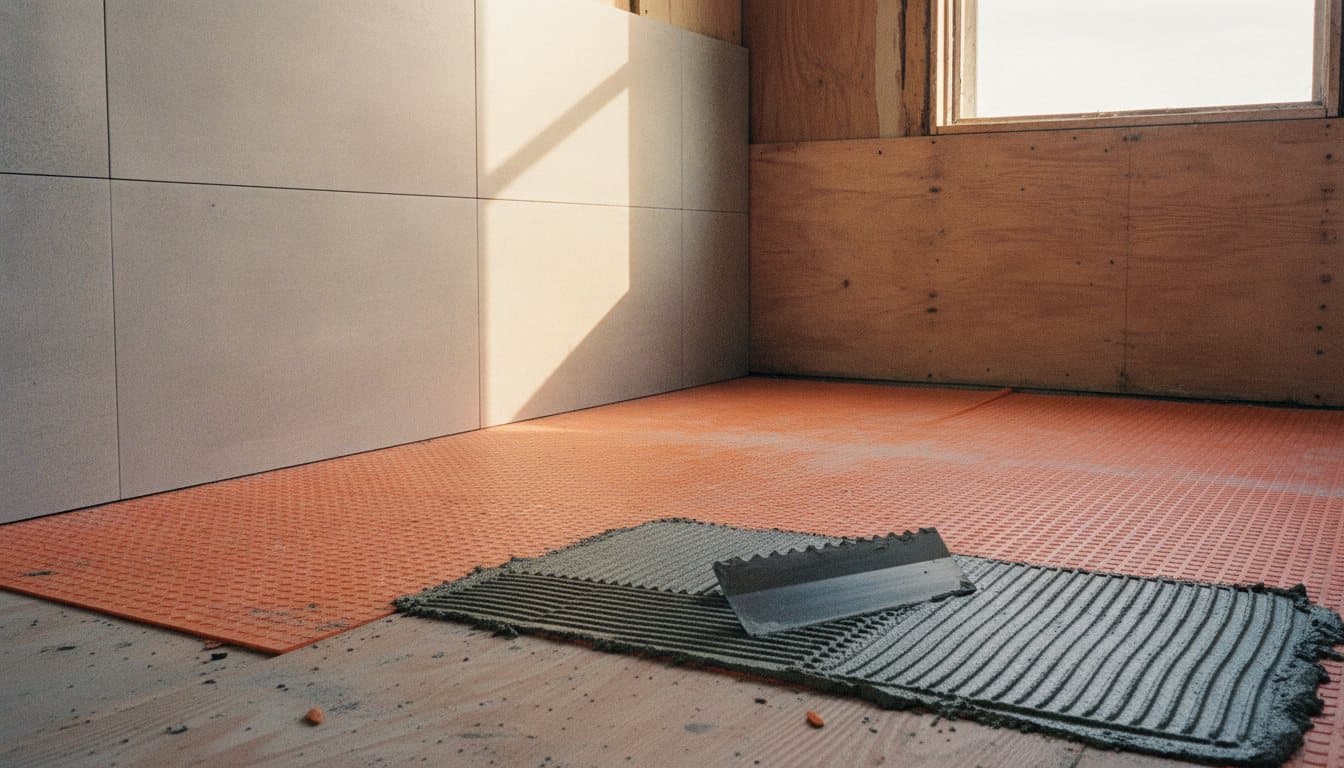
2. The uncoupling membrane (the layer most installs skip)
This is the orange dimpled sheet you see in a real tile job, and on the shore it is not optional. An uncoupling membrane (Schluter DITRA is the one we use most) sits between the subfloor and the tile and does exactly what its name says: it uncouples the two. When the wood subfloor expands, contracts, and flexes with the seasons, the membrane lets it move independently of the tile above. The tile floats on top of the movement instead of cracking with it. The membrane also manages moisture, giving any water vapor in the assembly somewhere to go instead of building pressure under the tile. On a flexing shore subfloor over an unconditioned crawl space, the uncoupling membrane is the single layer that prevents most of the cracked-tile failures we get called to fix.
3. Waterproofing
In the wet zones (the shower, the area around the tub, and increasingly the whole bathroom floor on a coastal home), the assembly has to be waterproofed, not just water-resistant. That means a bonded waterproof membrane (sheet membrane like Schluter KERDI or a liquid-applied membrane like RedGard) over the substrate, with every seam and corner sealed and every penetration (drain, valve, bench) flashed. Cement board is not waterproof. Greenboard drywall is not waterproof. Both absorb water and fail at the shore. A real waterproofing layer keeps the moisture in the tile and grout where it belongs and out of the framing.
4. The bonding mortar (thinset), chosen correctly
The thinset is the adhesive that bonds the tile to the membrane. It is not all the same. A shore bathroom needs a polymer-modified thinset rated for the substrate and the tile (large-format porcelain needs a large-and-heavy-tile mortar, not a stock wall thinset), troweled with the right notch size to get full coverage under the tile. The number one workmanship failure we find under cracked shore tile is voids: thinset troweled too thin, or not back-buttered on a large tile, leaving hollow spots under the tile that crack the first time weight lands on them. Full mortar coverage is the spec, and it is the difference between a floor that lasts and one that sounds hollow when you tap it.
The Shortcuts That Become a Tear-Out
When we tear out a failed shore bathroom floor, it is almost always one of these five shortcuts that caused it. Every one of them was invisible the day the job finished and looked fine for a year or two.
- Tile set straight onto the plywood subfloor. No uncoupling membrane, no backer. The wood moves, the tile cracks. This is the most common failure we find in DIY and low-bid jobs.
- Tile over a flexing subfloor that was never reinforced. The installer skipped the structural check, set beautiful tile over a bouncy floor, and the deflection cracked the grout and then the tile within two winters.
- Greenboard or regular drywall in the wet zone. It absorbs water, swells, loses its bond, and the tile lets go. Cement board with no waterproofing is only marginally better.
- No flashing at the drain, curb, or bench. Water finds the one unsealed penetration, gets behind the waterproofing, and rots the framing while the surface still looks fine.
- Thinset voids under large-format tile. Hollow spots that crack under point loads. You hear it before you see it: a hollow tap underfoot near the failure.
None of these are exotic. They are the corners that get cut to hit a low number, and they are all buried where no homeowner can see them at the final walkthrough. By the time the crack shows up, the only fix is a tear-out.
How This Connects to the Rest of a Shore Bathroom
The underlayment is the foundation, but it is one part of a bathroom that has to hold up to coastal conditions as a whole. The same logic that governs what goes under the floor governs the tile you choose, the grout you use, and how a curbless or low-threshold shower is built. We covered tile selection for wet shore floors in our guide to shower floor tile sizes at the Jersey Shore, the realities of a barrier-free build in curbless shower tile at the Jersey Shore, and the most common surface-level failure in why shower tile cracks. The underlayment is the layer that makes all of those choices last.
What We Do on a Monmouth or Ocean County Bathroom Floor
On every shore bathroom we tile, the underlayment is speced before we talk about the tile. We check the subfloor for thickness and deflection and reinforce it if it does not meet the L/360 standard for tile. We set an uncoupling membrane over the entire floor on framed subfloors. We waterproof the full wet zone with a bonded membrane, flash every penetration, and pressure-test where it matters. We bond the tile with a thinset rated for the tile and the substrate, with full coverage verified, not assumed. The floor that results does not crack the third winter, because the layer that usually fails was built to do its job.
If you have a cracked bathroom floor in Monmouth or Ocean County, a floor that sounds hollow when you walk on it, or you are planning a bathroom remodel and want it built to last at the shore, reach out for an honest look at what is under your floor. We will tell you what the existing assembly is, what failed or will fail, and what it takes to build a floor that survives the coast. Call or text JL Tile & Stone at (848) 210-1946.